Transforming your home into a beautiful oasis doesn’t have to break the bank.
With a sprinkle of creativity and a dash of resourcefulness, you can create stunning DIY decor that reflects your personal aesthetic.
In this listicle, we’ve gathered 15 fabulous DIY projects that are not only budget-friendly but also bring a touch of charm and elegance to your living space. Get ready to unleash your inner designer and elevate your home aesthetic!
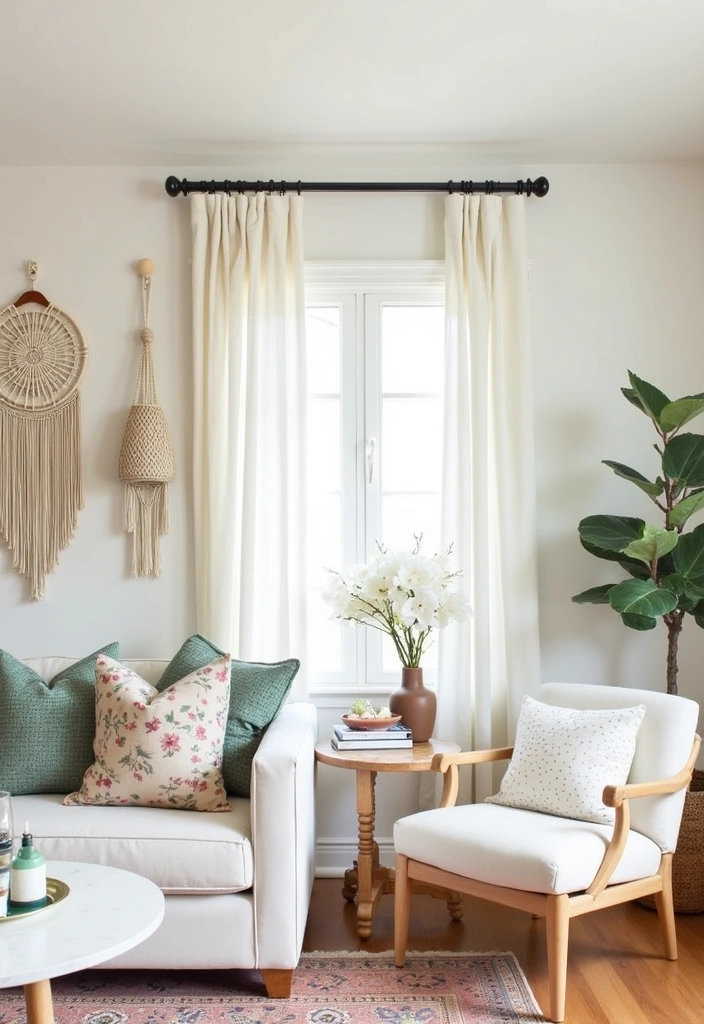
1. DIY Macrame Plant Hangers
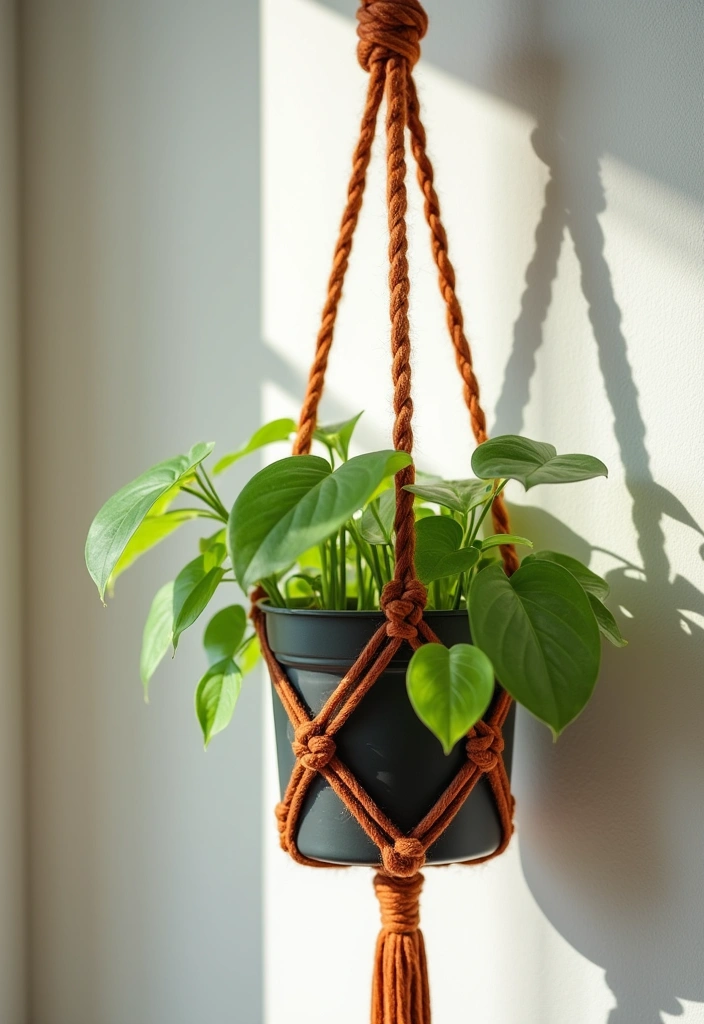
Bring a bohemian touch to your home with DIY macrame plant hangers. These intricate hangers not only showcase your favorite plants but also serve as artistic decor pieces that enhance your home aesthetic.
Imagine the lush greenery of your houseplants suspended in beautifully knotted cotton cord, their vibrant colors contrasting against the natural fibers. Macrame plant hangers add an element of warmth and texture to your living space, effortlessly infusing it with a relaxed, inviting vibe.
Creating these hangers is a fulfilling project that allows you to express your creativity while staying budget-friendly. You don’t need to be a crafting expert; with just a few simple macrame techniques, you can create stunning pieces that range from minimalist to elaborate designs. Whether you prefer the clean lines of a simple knot or the intricate patterns of a more complex design, there’s a style for everyone.
Gather your supplies: affordable cotton cord, scissors, and a sturdy ring to start. You might also want to have some plant pots on hand to visualize how your hangers will showcase the greenery.
As you work through the knots and patterns, you’ll find a meditative quality to the process. It’s not just about making a plant hanger; it’s about creating something that reflects your personality and enhances your home aesthetic.
Once completed, hang your macrame creations in your living room, kitchen, or even a cozy corner of your bedroom. You’ll notice how they draw the eye and add dimension to the space. Each time you water your plants or simply admire them, you’ll appreciate the unique touch you’ve added to your home decor.
So, gather your materials, invite a friend over for a crafting session, and get ready to transform your space with these beautiful DIY macrame plant hangers. They’re not just functional; they’re a celebration of your creativity and a perfect addition to your home aesthetic.
2. Upcycled Wine Bottle Vases

Transforming empty wine bottles into chic vases is a delightful DIY project that not only enhances your home aesthetic but also allows you to express your creativity without breaking the bank.
With just a little paint or some twine, these once-forgotten bottles can become stunning decor pieces that elevate the style of any room. The best part? This project is entirely budget-friendly, making it perfect for those who wish to refresh their space without spending a fortune.
Begin by gathering your empty wine bottles. Choose a variety of shapes and sizes to add dimension and interest to your display. Clean them thoroughly and remove any labels.
Once your bottles are prepped, let your imagination run wild. You might opt for a rustic look by wrapping them in jute or burlap, adding a warm, textured element to your decor. For a more modern aesthetic, consider using metallic spray paint in gold, silver, or copper, which can create a sleek and polished finish that catches the light beautifully.
Don’t shy away from experimenting with colors and finishes. A soft pastel hue can bring a touch of whimsy, while a bold, dark color can make a striking statement. If you’re feeling adventurous, try a technique like ombre for a unique twist that blends two colors seamlessly.
Once your bottles are painted or wrapped, you can use them in various ways. Fill them with fresh flowers to bring life and color into your home. A single stem or a small bouquet can create an elegant centerpiece for your dining table or a charming accent on a nightstand.
Alternatively, these vases can stand alone as sculptural pieces. Group them together on a shelf or table, mixing and matching heights and colors to create a visually appealing display. Consider placing them near a window where they can catch the light, casting beautiful shadows and reflections.
Whether you’re looking to create a focal point in your living room or add a touch of elegance to your bedroom, upcycled wine bottle vases are a perfect choice. This DIY project not only enhances your home aesthetic but also showcases your personal style, making your space feel uniquely yours.
So, gather those empty bottles and get creative! You’ll be amazed at how such simple materials can transform your environment into a chic and inviting sanctuary.
3. Custom Framed Art
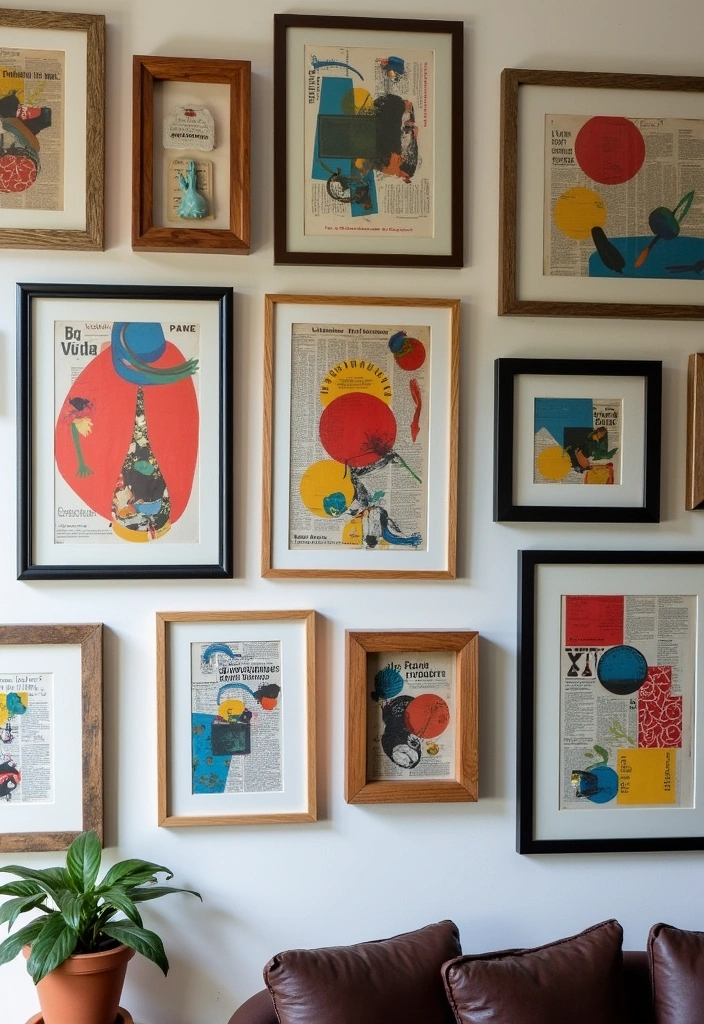
Custom framed art serves as a unique expression of your personality, allowing you to bring your artistic vision to life right in your home. The beauty of this DIY project lies in its versatility; you can use various materials to create stunning pieces that resonate with your style.
Old magazines are a treasure trove of inspiration. Cut out striking images, quotes, or patterns that speak to you, and assemble them into a cohesive collage. This not only gives your walls a personal touch but also allows you to recycle materials, making it a budget-friendly option. Alternatively, if you have a knack for painting or drawing, unleash your creativity on a canvas or even thick paper. Your original artwork can bring vibrancy and individuality to your space.
Once you’ve created your masterpiece, the next step is framing. The right frame can elevate your artwork from simple to stunning, turning it into a focal point that draws attention. Consider the aesthetic of your home when choosing frames. A rustic wooden frame might complement a cozy, farmhouse-style room, while a sleek metal frame could enhance a modern, minimalist space. Mixing and matching different frames can also create an eclectic gallery wall that showcases your personality and creativity.
Arranging your framed art in a gallery style can maximize its impact. Start by laying your frames on the floor to experiment with different layouts before committing to the wall. This allows you to visualize how the pieces will interact and ensures a harmonious arrangement. Don’t be afraid to include various sizes and orientations; this adds depth and interest to your display.
Incorporating custom framed art into your home decor not only transforms your space but also adds a layer of storytelling. Each piece reflects your journey, interests, and creativity, making your home a true reflection of who you are. With a little effort and imagination, you can create a captivating gallery that is both beautiful and budget-friendly, perfectly aligned with your home aesthetic.
4. Cozy Knit Blankets
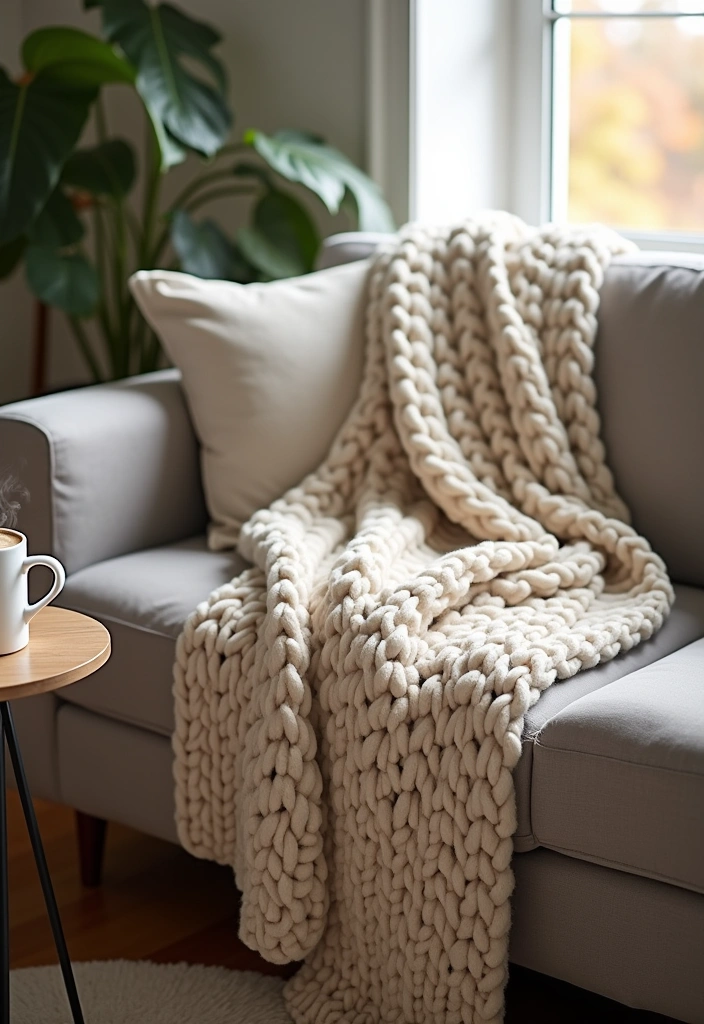
Knit your own cozy blankets to add comfort and style to your living space.
Creating a handmade blanket is not only a rewarding craft but also an excellent way to enhance your home aesthetic. Using soft, luxurious yarns, you can fashion beautiful textures that invite relaxation and warmth. Imagine curling up on your couch or bed with a blanket you lovingly crafted, wrapping yourself in not just fabric, but in a piece of art that reflects your personality.
Whether you opt for a chunky knit that offers a bold statement or a delicate pattern that whispers elegance, each choice contributes to the overall vibe of your home. A chunky knit blanket can serve as a stunning focal point, adding depth and coziness to your décor. On the other hand, a finely patterned blanket can bring a touch of sophistication, making your living space feel more polished.
Drape your handmade blanket over a couch or bed to instantly elevate your home aesthetic. This simple act can transform an ordinary seating area into a stylish sanctuary, inviting guests to sit down and relax. Choose colors that complement your existing décor or go bold with contrasting hues to create a pop of color that invigorates the room.
Additionally, knitting a blanket can be a budget-friendly project. With just a few skeins of yarn and some time, you can create something truly special without breaking the bank. Plus, the satisfaction of wrapping yourself in a blanket that you made with your own hands is unparalleled.
Whether you’re a seasoned knitter or just starting out, the process of creating a cozy knit blanket is a delightful journey. So gather your materials, find a comfy spot, and let your creativity flow! Your home will thank you for the warmth and style that a handmade blanket brings, making your space feel inviting and uniquely yours.
5. Hand-Painted Terracotta Pots
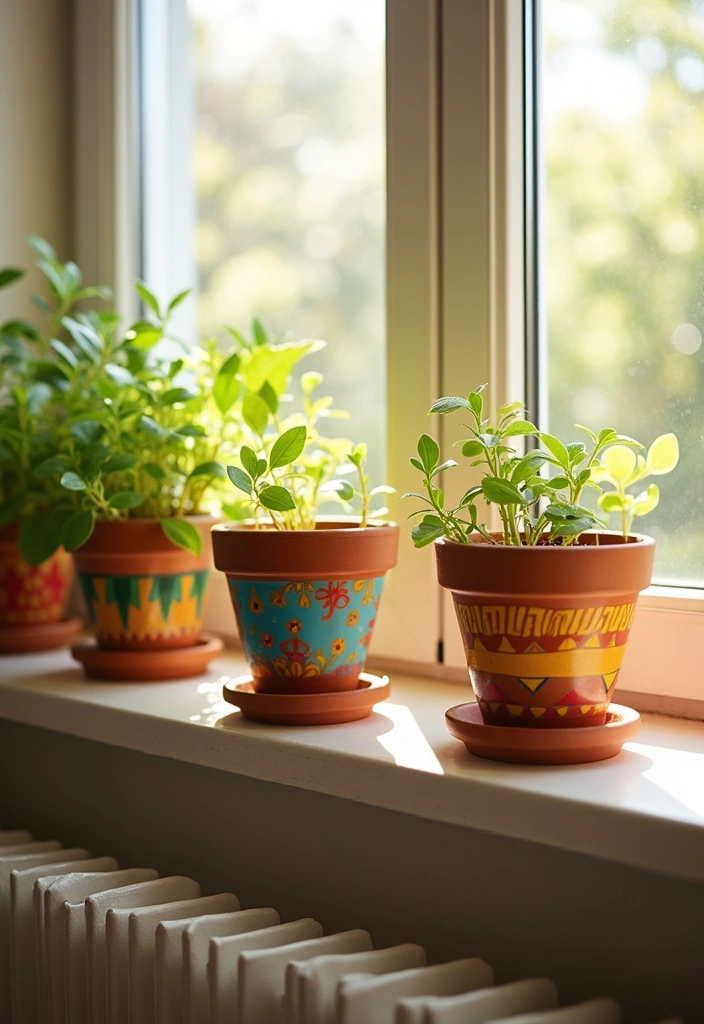
When it comes to enhancing your home aesthetic, few projects are as delightful and budget-friendly as hand-painted terracotta pots. These charming pieces not only serve as stylish plant containers but also allow you to express your creativity and personality in your living space.
Start by gathering some plain terracotta pots, which can be found at most garden centers or craft stores at a minimal cost. The warm, earthy tone of terracotta provides the perfect canvas for your artistic endeavors. Using acrylic paints, you can unleash your imagination and turn these pots into vibrant masterpieces.
Consider incorporating various design elements that reflect your style—geometric patterns, floral motifs, or even abstract art can all add a unique flair. If you’re feeling particularly inspired, why not add motivational quotes or personal mantras that uplift your spirit every time you glance at your plants? Personalization is key in creating a home aesthetic that feels truly yours.
Once your pots are painted and dried, it’s time to arrange them in your home. Place them on windowsills where they can catch the sunlight, or group them on shelves to create an eye-catching display. You can mix sizes and designs for an eclectic look or coordinate colors for a more streamlined aesthetic.
These hand-painted terracotta pots not only bring a splash of color to your indoor garden but also make for wonderful conversation starters when you have guests over. Plus, the satisfaction of creating something lovely with your own hands makes this DIY project even more rewarding.
So, gather your supplies and let your creativity flow! Hand-painted terracotta pots are a fantastic way to infuse your home with personal charm while keeping your budget in check. Your plants will thrive in their new colorful homes, and your space will radiate warmth and creativity, embodying the true essence of DIY home decor.
6. DIY Wall Art with Fabric Scraps
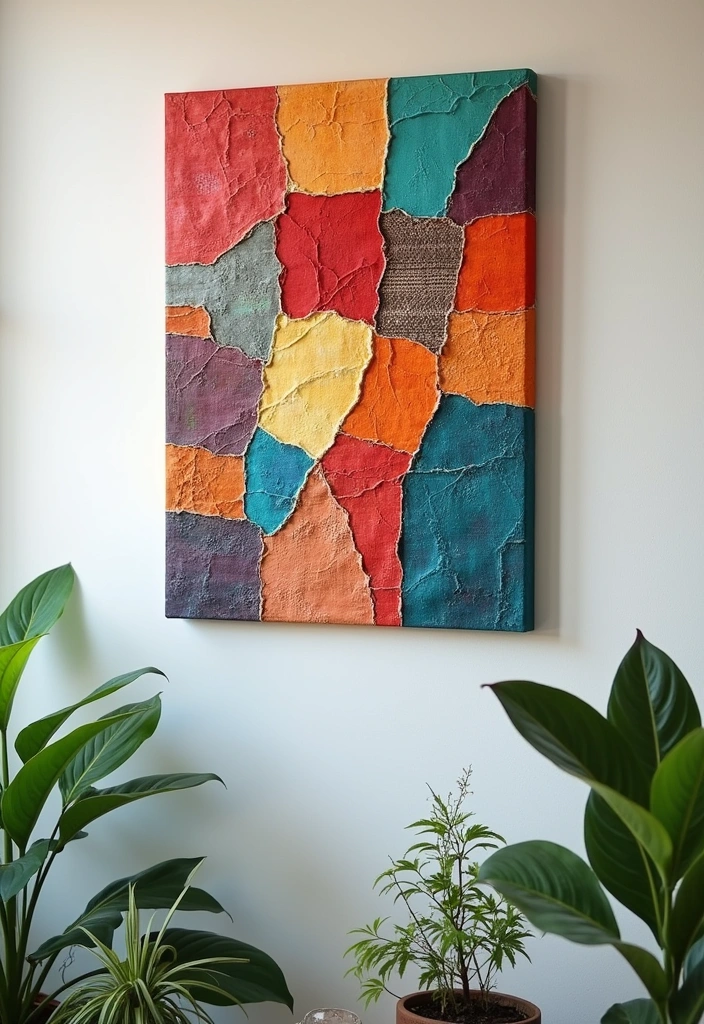
Creating unique wall art from leftover fabric scraps is a delightful way to infuse your home with personal flair while staying budget-friendly. Not only does this project allow you to recycle and repurpose materials, but it also presents an opportunity to showcase your creativity in a visually striking manner.
Start by gathering your fabric scraps. These can come from old clothing, leftover projects, or even thrift store finds. The beauty of this project lies in the variety of textures and colors you can combine. Think about mixing cottons, silks, linens, and even denim. Each fabric brings its own character, and together they can create a stunning visual tapestry.
Next, choose your base. A canvas or a wooden board works best, providing a sturdy foundation for your artistic endeavor. If you’re going for a more rustic vibe, reclaimed wood can add an extra layer of charm.
Before you start gluing, lay out your pieces to see how they interact with one another. Play with patterns, layering, and placement. This part is all about experimentation, so don’t be afraid to rearrange until it feels just right. Consider the color scheme of the room where you’ll hang your art—select fabrics that either complement or contrast your existing decor to create a cohesive look.
Once you’re satisfied with your arrangement, it’s time to adhere the fabric to your canvas or board. Fabric glue works well, but you can also use a hot glue gun for a quicker hold. Apply a thin layer of glue to the back of each scrap and press it firmly onto your base. For added dimension, consider overlapping some pieces or crumpling them slightly before gluing.
After everything is secured, let your masterpiece dry completely. You can finish it off with a sealant to protect your art from dust and fading, especially if it will be displayed in a sunlit area.
Once dry, hang your new wall art in a prominent space in your home. Whether it’s your living room, hallway, or even a cozy nook, this eye-catching piece will become a conversation starter.
Not only does this DIY project allow you to express your style, but it also brings a sense of warmth and personality to your space. Each scrap tells a story, reflecting your journey and creativity while contributing to a more sustainable lifestyle.
So gather your fabric scraps and unleash your imagination—your home aesthetic will thank you for it!
7. Upcycled Ladder Bookshelf
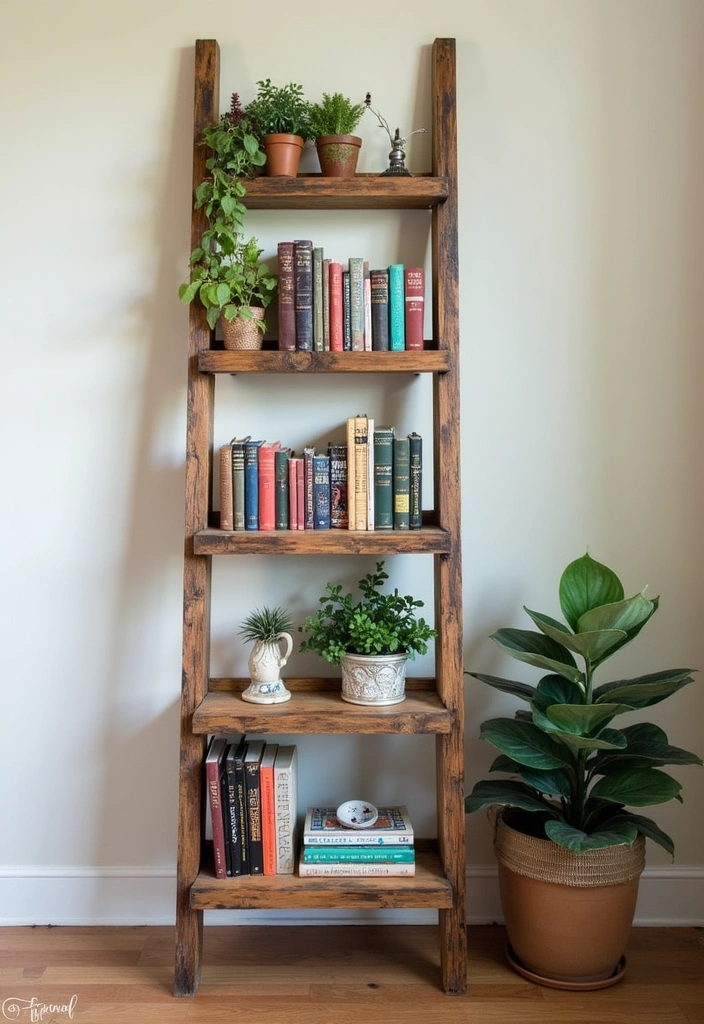
Transforming an old wooden ladder into a stylish bookshelf is not just a clever way to repurpose an item; it’s an opportunity to infuse your space with personality and charm. This DIY project is particularly appealing for those who appreciate a home aesthetic that tells a story. Each knot and scratch in the wood adds character, turning a simple ladder into a unique piece of art.
To get started, you’ll want to give your ladder some love. Begin by sanding down any rough edges to ensure a smooth finish. This step not only enhances the look but also makes it safer for handling your books and decor. If you prefer a rustic feel, you might choose to leave it in its natural state. However, for a more modern twist, a fresh coat of paint can work wonders. Opt for colors that complement your existing decor, whether that’s a crisp white, a bold navy, or even a soft pastel.
Once your ladder is prepped, it’s time to showcase your favorite books, plants, or decorative items. Position the ladder against a wall for a classic bookshelf vibe, or use it as a room divider to create a cozy reading nook. This versatile piece can easily adapt to your space and needs.
Adding personal touches like framed photos, small potted plants, or decorative boxes can enhance the visual appeal. Consider mixing and matching items to create an engaging display that reflects your style. The open structure of the ladder allows for airiness, making it an excellent choice for smaller spaces where traditional bookshelves might overwhelm.
The beauty of this DIY project lies not only in its aesthetic appeal but also in its budget-friendly nature. With a little creativity and effort, you can craft a stunning focal point in your home without breaking the bank. Whether you lean towards a farmhouse aesthetic or a sleek contemporary look, an upcycled ladder bookshelf is a delightful addition that will elevate your home decor.
8. DIY Decorative Mirrors
Creating stunning decorative mirrors is a fantastic way to enhance the light and space in your home while keeping your budget in check. These DIY projects not only serve a practical purpose but also add a unique flair to your decor, making them a perfect fit for anyone looking to elevate their home aesthetic.
Start by gathering simple materials that you might already have at home. Cardboard is a versatile choice; it can be cut and shaped into various designs to suit your style. Think of geometric patterns or organic shapes that can frame your mirror beautifully.
If you have some wooden sticks lying around, consider using them to craft a rustic or modern frame. By arranging them in a sunburst pattern or stacking them for a layered effect, you can add depth and texture to your mirror. A little paint can go a long way here—choose colors that complement your existing decor or go bold for a statement piece.
For a beachy vibe, seashells are an excellent option. Collect shells during your next trip to the beach or purchase them from a craft store. Glue them around the mirror’s edges for a coastal charm that brings a sense of tranquility to your space. This idea is particularly delightful in bathrooms or bedrooms, where you can create a serene retreat.
When hanging these mirrors, consider their placement carefully. Entryways are perfect spots, as they create an inviting atmosphere while also making the space feel larger. In living rooms, mirrors can reflect light and enhance brightness, making the room feel airy and open.
Additionally, you can play with different shapes and sizes. A cluster of small mirrors can create a gallery wall effect that adds visual interest and personality to your space. This budget-friendly approach not only saves you money but allows for endless creativity and customization.
Incorporating DIY decorative mirrors into your home decor is a fun and rewarding project. Whether you choose to keep it simple or get intricate with designs, these mirrors will undoubtedly enhance your home aesthetic, making your space feel more inviting and stylish. So gather your materials, unleash your creativity, and watch as your mirrors transform into stunning decorative pieces that shine in every way!
9. Personalized Throw Pillows
Throw pillows are more than just functional accessories; they are the perfect way to infuse your personality into your living space. By creating your own custom pillows, you not only enhance the comfort of your seating areas but also add a personal touch that reflects your style.
Using fabric paint or iron-on transfers opens up a world of creativity. You can easily design pillows that showcase your favorite quotes, patterns, or images that resonate with you. Imagine curling up on your couch with a pillow that features a motivational quote that inspires you or a whimsical pattern that sparks joy every time you see it.
Start by choosing a color palette that complements your existing décor. This could be anything from bold, vibrant hues to soft, muted tones, depending on the ambiance you want to create. Once you have your colors in mind, gather your materials—plain pillow covers, fabric paint, or iron-on transfer sheets. The beauty of this DIY project is that it can be done on a budget, making it accessible for everyone.
When it comes to design, the options are endless. You could go for a minimalist approach with simple geometric shapes or create a more intricate design featuring floral patterns or abstract art. If you prefer words over images, select quotes that resonate with you and use various fonts and sizes to create visual interest.
After you’ve designed your pillowcases, take your time applying the paint or transfers. Ensure that you follow the instructions for heat-setting if you’re using iron-on transfers, as this will help your designs withstand the test of time.
Once your pillows are complete, mix and match different designs and sizes to create a dynamic look on your couch or bed. Layering pillows with different textures and patterns adds depth and can transform a simple seating area into an inviting and cozy space.
Personalized throw pillows are a fantastic way to enhance your home aesthetic without breaking the bank. They provide comfort, style, and a unique touch that store-bought options simply can’t match. So gather your supplies, unleash your creativity, and get ready to refresh your home decor with this fun and fulfilling DIY project!
10. Rustic Wood Signage
One of the most delightful ways to enhance your home aesthetic is through the creation of charming rustic wood signs. These signs not only serve as functional decor but also add a unique character to your space, making it feel more inviting and personalized.
Using reclaimed wood, you can embark on a DIY project that speaks to your creativity and style. The beauty of reclaimed wood lies in its history and texture, which can instantly bring warmth and a sense of nostalgia to any area of your home. The imperfections and variations in the wood grain tell a story, making each sign truly one-of-a-kind.
Consider crafting signs with clever sayings that resonate with you and your family. Phrases like “Home Sweet Home,” “Gather Here,” or “Good Vibes Only” can add a touch of whimsy and positivity to your environment. Alternatively, directional arrows pointing to different rooms or outdoor spaces can guide guests through your home while being charmingly decorative at the same time.
When it comes to design, the options are endless. You can paint the signs in colors that complement your existing decor, ensuring a harmonious look throughout your home. Soft pastels can evoke a calming atmosphere, while bold colors can make a statement. Don’t shy away from mixing and matching fonts and sizes to create a visual interest that reflects your personality.
These rustic wood signs are incredibly versatile. Use them indoors to enhance your living room, kitchen, or entryway, or venture outdoors to add a welcoming touch to your porch or garden. They can even serve as perfect gifts for friends and family, spreading the joy of personalized decor.
Best of all, crafting these signs is a budget-friendly project that allows you to express your creativity without breaking the bank. With just a few basic tools, some reclaimed wood, and a splash of paint, you can transform ordinary materials into stunning pieces that elevate your home aesthetic.
So gather your materials, unleash your creativity, and start crafting rustic wood signs that will surely bring charm and character to your living space. Whether it’s a thoughtful quote or a directional guide, these DIY projects will not only beautify your home but also give it that personal touch that makes it truly yours.
11. DIY Candle Holders
Craft your own stunning candle holders to infuse your home with warmth and charm.
Using simple materials like glass jars, rustic wood slices, or even moldable clay, you can create unique holders that perfectly match your decor.
Personalized candle holders not only elevate your dining or coffee tables but also wrap your space in a cozy embrace, making evenings feel extra special.
Light up your nights with these budget-friendly DIY projects that add a touch of elegance and a whole lot of love to your home aesthetic!
12. Fabric Wall Hangings
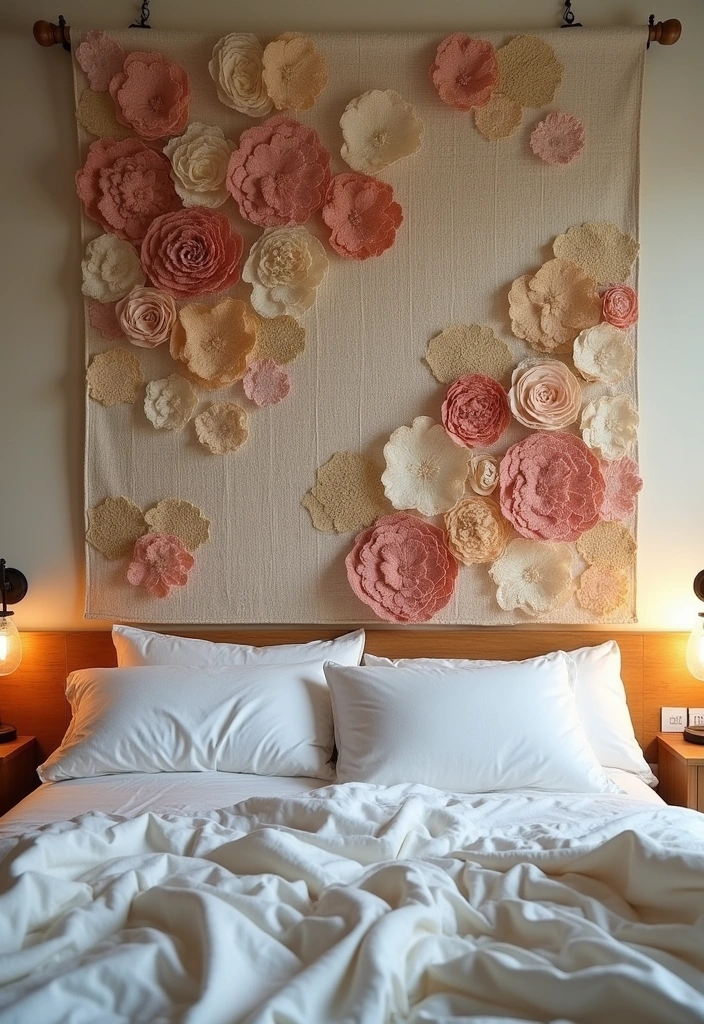
Enhance your walls with soft fabric wall hangings that add texture and warmth to your home. These charming pieces not only brighten up your space but also bring a cozy, inviting atmosphere that makes any room feel more like home.
Using fabric remnants, you can create beautiful designs that reflect your unique style and personality. Whether you have a flair for the dramatic or prefer something more understated, the possibilities are endless. Mix and match colors, patterns, and textures to create a stunning wall display that will capture the attention of anyone who enters the room.
These hangings can be simple or detailed, depending on your preference and skill level. If you’re new to crafting, start with basic shapes and patterns. As you become more comfortable, experiment with intricate designs, layering techniques, or even adding embellishments like beads or tassels for added flair.
Fabric wall hangings serve as stunning focal points in any room, effortlessly elevating your home aesthetic. Hang them above your bed or couch for an instant aesthetic upgrade, or create a gallery wall with multiple pieces for an eye-catching display. The beauty of these DIY projects is not only in their visual appeal but also in the personal touch you bring to your space.
Moreover, fabric wall hangings are a budget-friendly option for those looking to refresh their decor without breaking the bank. You can repurpose old curtains, tablecloths, or even thrifted fabric remnants, making it a sustainable choice that aligns with a more conscious lifestyle.
So, grab your sewing machine or some fabric glue, and let your creativity flow. Transform your walls into a tapestry of color and texture that reflects your style and elevates your home aesthetic. With just a few fabric remnants and a little imagination, you can create a warm and inviting atmosphere that makes your space truly your own.
13. DIY Floating Shelves
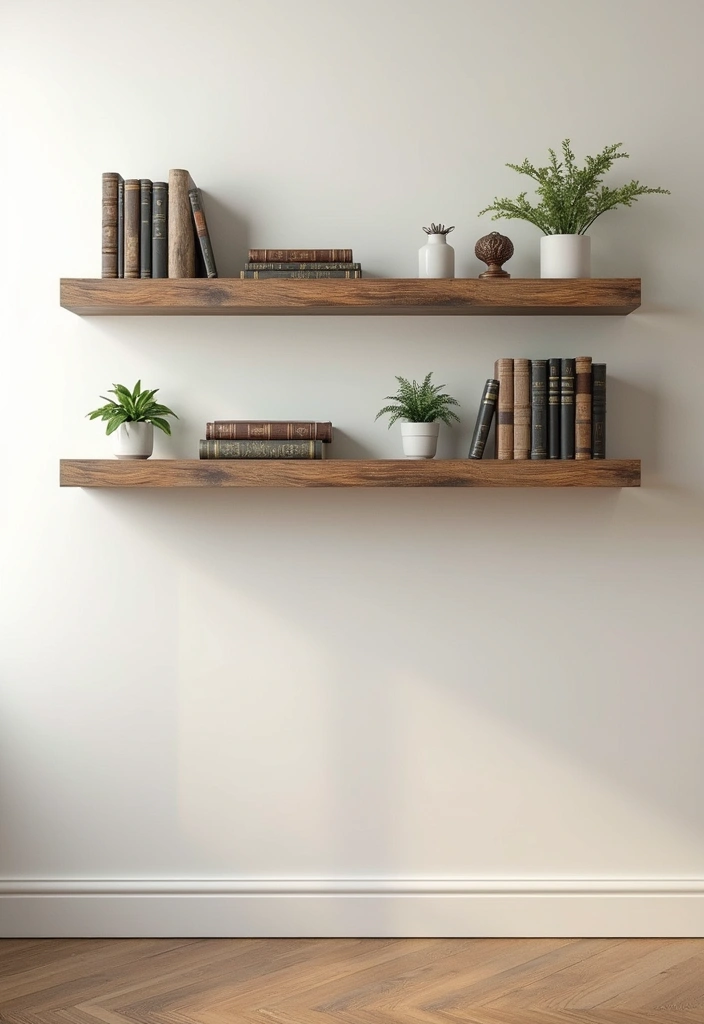
Floating shelves are a fantastic way to add a modern touch to your home aesthetic while providing functional storage solutions. They not only maximize vertical space but also serve as a creative canvas for showcasing your personality.
Using reclaimed wood for these shelves not only gives them a unique character but also aligns with eco-friendly practices. Each piece of reclaimed wood has its own history and charm, making your shelves truly one-of-a-kind. Plus, opting for reclaimed materials means you’re making a sustainable choice that benefits the planet.
Positioning your floating shelves strategically can significantly enhance the visual interest in your room. Consider placing them at varying heights to create a dynamic display. This not only draws the eye but also encourages a playful arrangement of your items.
Think about what you want to showcase. Books, plants, and decorative items can all find a home on these shelves. Use them to highlight your favorite novels, or display a collection of vibrant plants to bring a touch of nature indoors.
For a cohesive look, choose decorative items that complement the overall theme of your room. Whether you prefer a minimalist aesthetic or a more eclectic vibe, the right combination can elevate your home decor.
To create your floating shelves, you’ll need some basic tools and materials. Start by cutting the reclaimed wood to your desired length. Sand the edges to ensure a smooth finish, then apply a protective stain or sealant to enhance the wood’s natural beauty and durability.
Next, install sturdy brackets that can support the weight of your items. Floating shelves are designed to give the illusion of being suspended, so it’s essential to ensure they are securely mounted.
Once installed, take a step back and admire your handiwork! You’ll find that these DIY floating shelves not only provide extra storage but also serve as a focal point in your room.
Incorporating these shelves into your home decor is a budget-friendly way to transform your space. With a little creativity and effort, you can create a stylish and functional display that reflects your unique taste while enhancing your home aesthetic.
14. Creative Photo Display
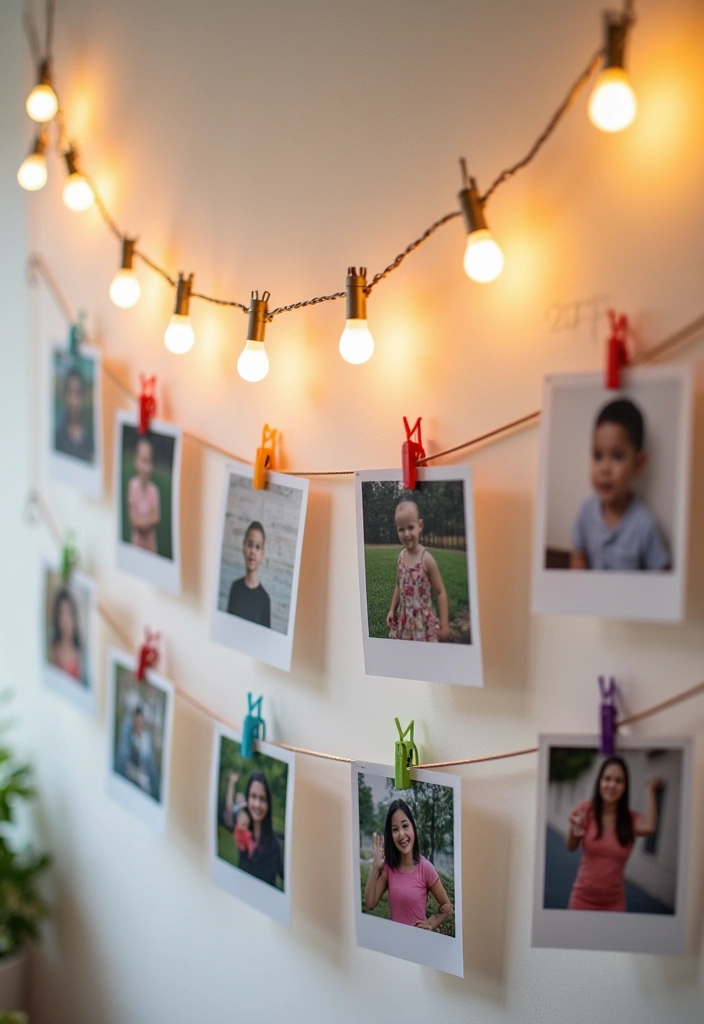
Showcase your favorite memories with a creative photo display that adds a personal touch to your space.
Using string lights, clips, or a wire grid, you can easily create a dynamic display that highlights your favorite moments.
This DIY project can be tailored to your aesthetic, whether you prefer a casual, eclectic look or something more polished and structured.
To get started, gather your materials. String lights can be found at any home goods store, and they come in various styles, from warm white to colorful options. Choose clips that resonate with your personality; wooden clothespins, metallic clips, or even decorative ones can add character to your display. If you prefer a wire grid, these can also be sourced from craft stores or online retailers, and they provide a modern, sleek framework for your photos.
Next, curate your selection of photos. Think about the memories you’d like to showcase—travel adventures, family gatherings, or candid shots that make you smile. If you’re feeling particularly creative, consider mixing in other elements like postcards, art prints, or even dried flowers to add depth and variety to your arrangement.
Now comes the fun part: arranging your display! If you opt for string lights, you can drape them along a wall or across a bulletin board. Secure the string lights with adhesive hooks or nails, ensuring they’re evenly spaced. Clip your photos along the lights, allowing them to hang freely for a whimsical look.
For a wire grid display, you can mount the grid on the wall and use clips to attach your photos. This method allows for easy rearrangement, so you can update your display as new memories are created.
Consider the lighting in your space as well. A warm glow from the string lights can create a cozy ambiance, making your photo display not just a decorative piece but also a source of soft lighting in the evening.
This creative photo display is not only a wonderful way to reminisce about cherished moments but also serves as a unique focal point in your home. It invites conversation and adds a personal aesthetic that reflects your journey and personality.
Whether you choose to go for an eclectic vibe or a more structured look, this DIY project is a budget-friendly way to elevate your home aesthetic. So gather your materials, unleash your creativity, and let your favorite memories shine bright in your space!
15. DIY Entryway Bench
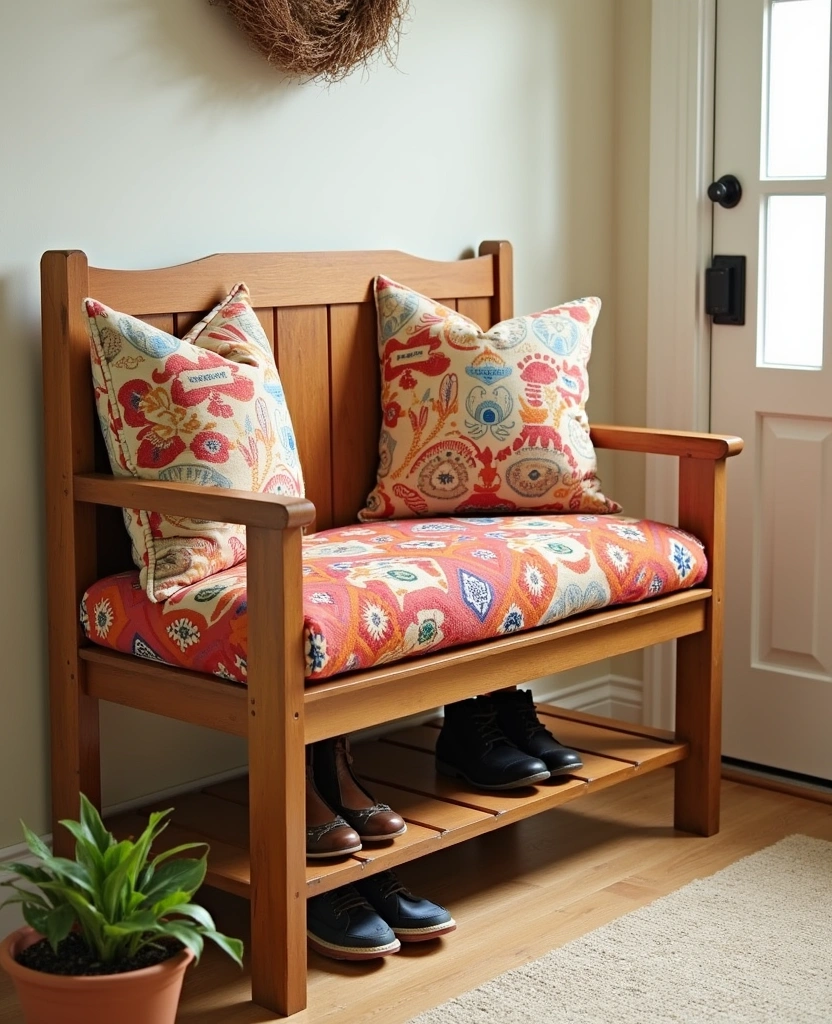
Creating a functional and stylish entryway bench can significantly enhance the first impression of your home. This DIY project not only offers a practical solution for seating and storage but also serves as a beautiful statement piece that reflects your unique home aesthetic.
To begin, select a sturdy wood that suits your style—pine, oak, or even reclaimed wood can all add character and charm. If you’re looking for something budget-friendly, consider visiting local lumber yards or repurposing old furniture. The wood can be cut to your desired dimensions, ensuring it fits perfectly in your entryway.
Once you have your wood prepared, assemble the bench by attaching the legs to the seat securely. You can either opt for a simple rectangular shape or get creative with curves and angles for a more modern look. Sand down any rough edges to create a smooth finish, which is essential for both safety and aesthetics.
Now comes the fun part—personalizing your bench to match your home aesthetic! This is where your creativity can really shine. Choose a paint color or stain that complements your existing decor, or even consider applying a bold hue for a striking contrast. If you prefer a more rustic look, leaving the wood natural and applying a clear sealant can bring out its beauty.
Next, add cushions to the top of the bench for comfort. Selecting fabric that matches your overall theme can tie the whole entryway together. You might opt for chic patterns, vibrant colors, or even textured materials that invite guests to sit down and relax. If you’re handy with a sewing machine, creating custom cushion covers can be a fun way to add a personal touch.
To maximize functionality, incorporate storage options underneath the bench. You could use baskets, bins, or even build drawers into the design. This not only keeps your space tidy but also provides a convenient spot for shoes, bags, or other everyday items that tend to clutter the entryway.
By taking the time to craft this DIY entryway bench, you’ll create an inviting atmosphere that sets the tone for your home. The combination of style and practicality not only enhances your space but also offers a warm welcome to family and friends. Embrace your creativity and transform this simple project into a stunning centerpiece that reflects your personal taste while remaining budget-friendly.
Conclusion
These 15 fabulous DIY projects showcase how you can transform your home aesthetic without spending a fortune.
With a little creativity and effort, each project can bring a unique charm to your living space, making it feel more personal and inviting.
Which DIY project are you excited to try first? Share your creations and inspire others on their home decor journey!